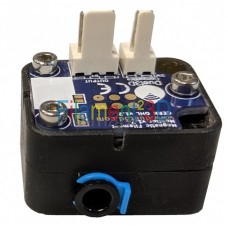
Duet3D Rotating Magnet Filament Monitor KIT
This is a KIT
Introduction
The filament monitor consists of a PCB which senses the rotation of a diametrically magnetised magnet. That magnet is in turn rotated by the filament motion via a hobbed part. The angle is reported to the Duet (see section on technical details for how this is done). This diagram shows the general principle.

Note RRF v2.03 or later is required to support the Magnetic Filament Monitor, version 2.04RC4 or later is recommended.
Using the Filament monitor
Wiring

Note: on 1.7a the SW pinout is reversed and the output connector is fitted the other way around.

Connecting to the Duet
Duet 3
Important! If you are using a Duet 3 or 3 Mini with tool or expansion boards, then the filament monitor must be connected to the same board as the motor for the extruder that it is monitoring. Filament monitors connected to tool and expansion boards are supported in RepRapFirmware 3.2beta4 and later.
Connect the filament monitor to the +3.3V, GND and IN pins of one of the IO_ connectors on the Duet 3 main board or on a tool or expansion board.
Duet 2
Connect the filament monitor to an endstop connection on the Duet 2 mainboard (typically E0 or E1, but you can also use any of X, Y or Z that are free).
Note: The Filament monitor must be connected to an endstop on the Duet 2 Wifi, Duet 2 Ethernet or Duet 2 Maestro. It does not work connected to an endstop on a Duex expansion board.
- For filament monitor version 1.7a and later use a cross over 3 wire cable with a molex KK on either end. (i.e. pin 1 to pin 3, pin 2 to pin 2, pin 3 to pin 1).
- For filament monitor version 1.7 use a straight through over 3 wire cable with a molex KK on either end. (i.e. pin 1 to pin 1, pin 2 to pin 2, pin 3 to pin 3).
Power on test
Once power is turned on, the filament monitor will flash the green LED 3 times to indicate the magnet is detected. The green LED will then flash periodically indicating communication to the Duet. If the magnet is rotating the LED will flash more frequently. For other LED flashing codes see the troubleshooting section below
Configuring Filament Monitoring
Important: the production version of the filament monitor requires 2.03 or later firmware running on the Duet.
RepRapFirmware 2.x
The filament monitor is configured using the M591 command. Here are some examples of that command:
M591 D0 P3 C3 S1 R70:130 L24.8 E3.0 ; Duet3D rotating magnet sensor for extruder drive 0 is connected to E0 endstop input, enabled, sensitivity 24.8mm.rev, 70% to 130% tolerance, 3mm detection length

M591 D0 ; display filament sensor parameters for extruder drive 0
Brief explanation of parameters:
- Dnn Extruder drive number (0, 1, 2...),
- Pnn Type of sensor: 0=none, 1=simple sensor (high signal when filament present), 2=simple sensor (low signal when filament present), 3=Duet3D rotating magnet sensor, 4=Duet3D rotating magnet sensor with microswitch, 5 = Duet3D laser sensor, 6 = Duet3D laser sensor with microswitch, 7 = pulse-generating sensor
- Cnn Which input the filament sensor is connected to. On Duet electronics: 0=X endstop input, 1=Y endstop input, 2=Z endstop input, 3=E0 endstop input etc. If you have a Duex 2 or Duex 5 in your system, note that C5 thru C9 (the endstop inputs on the DueX) cannot be used for filament monitors, but C10 and C11 (the endstop inputs on the CONN_LCD connector) can.
- Sn 0 = disable filament monitoring (default), 1 = enable filament monitoring when printing from SD card. S Filament monitors accumulate calibration data (where applicable) even when filament monitoring is disabled.
- Raa:bb Allow the filament movement reported by the sensor to be between aa% and bb% of the commanded values; if it is outside these values and filament monitoring is enabled, the print will be paused
- Enn minimum extrusion length before a commanded/measured comparison is done, default 3mm
- An (firmware 2.03 and later) 1 = check All extruder motion, 0 = only check extruder motion of printing moves (moves with both movement and forward extrusion)
- Lnn Filament movement per complete rotation of the sense wheel, in mm
Initially you will not know the exact "L" parameter to use so start with 28.4 and use the output of the calibration to tweak this.
RepRapFirmware 3.x
Same as for RepRapFirmware 2.x, except that the C parameter defines the pin name used.
- C"nn" - Where "nn" is the pin name the filament sensor is connected to (RRF_3 only)
Example:
M591 P3 C"e0_stop" S1 ; filament monitor connected to E0_stop
Calibration
- If you haven't done so already, send the M591 command with the correct parameters to tell the firmware about the sensor.
- Run M591 D# where # is the extruder number and check that the sensor angle is reported, to confirm that communication from the filament monitor to the Duet is working.
- Start a print.
- During and after the print, as soon as sufficient filament has been extruded you can use M591 D# (where # is the extruder number) to report the measured mm/rev averaged over the print thus far, and its variation.
- If you pause and then resume the print, calibration will be re-started and the values accumulated from before you paused will be discarded.
- The mm/rev value goes into the L parameter of the M591 command. Use a positive or negative sign as reported by M591. Set the R (tolerance) parameter to somewhat more than the reported variation.
How it works
- While a file is being printed the Duet Firmware reads the angle from the Filament monitor.
- The Duet firmware uses the parameters configured in M591 to determine the angle change that relates to a specific filament movement distance.
- Once net extruder movement greater than the number of mm configured in the E parameter (for example 3mm) has been commanded, the extrusion measured by the filament monitor is compared with the amount of extrusion commanded.&
Duet3D Rotating Magnet Filament Monitor KIT
- Mærke: Duet3D
- Model nummer: Duet3D Rotating Magnet Filament Monitor KIT
- Lager status: På lager
-
493,75DKr
- Eksl. Moms: 395,00DKr
Tags: duet3d, rotating, magnet, filament, monitor, elektronik


